(Optional) rel/10.0
Do you want to update Murder for 2026?
Feel free to skip this section!
This section is completely optional. If Git commands are intimidating, or if you just want to learn about Murder, feel free to proceed to the section on input binding.
-> Continue without updatingIf you want to update…
As of this writing, the HelloMurder repository was last updated 26 Feb 2025 (commit d7bbe36). This places it roughly mid-way through release 7.0 of the Murder engine. And release 11.0 may be just around the corner.
Keeping up with the fast pace of Murder development can be maddening, so let’s aim for a compromise – upgrading to the stable release 10.0, from January 31 2026 (rel/10.0).
In this section, we’ll:
- Update the Murder submodule
- Upgrade Program.cs
- Upgrade HelloMurderGame.cs
- Add a renderer
- Bind the Submit and Cancel buttons
- Bind inputs to the UI InputAxis
- Repair Features
- Repair Gum file (optional)
Update the Murder submodule
 If you are using Visual Studio 2022 or 2026, and have installed Git for Windows, you can open a command-line terminal from within the Visual Studio environment by pressing Ctrl+~ or View | Terminal.
 If you are using Visual Studio Code or Codium, this is a good opportunity to use Open Folder to set the folder you just created as your new workspace. We’ll still need the command line for Git commands.
To update the submodule, we’ll be carrying out these three tasks:
- Fetch the release data from GitHub
- Checkout the rel/10.0 branch
- Update Gum and Bang to match their state at rel/10.0
-
From the myhellomurder folder, navigate into the murder folder.
cd murder -
Now enter the following three commands into the command line:
git fetch
git checkout rel/10.0
git submodule update --init --recursive
With these steps, we’ve updated the Murder submodule to release 10.0, but the Hello Murder code won’t be able to compile as-is.
Upgrade Program.cs
Release 8.0 changed the error logging procedure: the GameLogger.CaptureCrash() method no longer supports an Exception argument. Our Program.cs file sends it an argument. So we need to modify our launcher in order for the game to compile.
We’ll be referencing Murder.Diagnostics.GameLogger CaptureCrash().
-
Open the file src/HelloMurder/Program.cs. It shouid look like this.
using Murder;
using Murder.Diagnostics;

namespace HelloMurder
{
    public static class Program
    {
        [STAThread]
        static void Main()
        {
            try
            {
                using Game game = new(new HelloMurderGame());
                game.Run();
            }
            catch (Exception ex) when (GameLogger.CaptureCrash(ex)) { }
        }
    }
}
We need to rework the
catch { }block slightly:- CaptureCrash() no longer accepts an exception argument, so it should read
CaptureCrash()instead ofCaptureCrash(ex). - CaptureCrash() is now a void, so it cannot be used in pattern matching. We need to change CaptureCrash into a typical statement within the
catch { }block. - Since we no longer need the ex, we should remove the ex from
catch (Exception ex).
Modify the catch statement so that it looks like this instead:
            try
            {
                using Game game = new(new HelloMurderGame());
                game.Run();
            }
            catch (Exception) {
                GameLogger.CaptureCrash();
            }
Save the file when complete.
- CaptureCrash() no longer accepts an exception argument, so it should read
Upgrade HelloMurderGame.cs
Starting with release 8.0, the IMurderGame interface requires that all implementations supply a ComponentsLookup property. Murder uses a Components Lookup manager to keep track of all ECS objects in the game. Prior to release 10.0, a basic ComponentsLookup manager is created automatically, but release 10.0 wants us to explicitly declare one.
(Thanks to @beho-dev for this code!)
We’ll be referencing Bang.ComponentsLookup.
Now, we’re going to modify our Game class instance.
-
Open the file src/HelloMurder/HelloMurderGame.cs.
-
First, include a reference to the Bang library:
using Bang; using Murder; using Murder.Serialization; using System.Text.Json; -
Then, we will add the ComponentsLookup.
Add the highlighted line to our code:
public class HelloMurderGame : IMurderGame
{
    /// <summary>
    /// <inheritdoc/>
    /// </summary>
    public string Name => "HelloMurder";

    public JsonSerializerOptions Options => HelloMurderSerializerOptionsExtensions.Options;

    public ComponentsLookup ComponentsLookup { get; } = new HelloMurderComponentsLookup();
}
Add a renderer
If you build the code now, as we had in the Architect document, you will notice that most things seem fine. But when you start the game…

We should be seeing a main menu here, but instead, we’re looking at a blank screen. That’s a problem.
The reason is that, as of release 9.0, a blank screen is now Murder’s default rendering behavior.
So, in order to render our own graphics, we’ll need to add a Murder.Core.Graphics.RenderContext. We can further customize the RenderContext with WindowChangeSettings and a ViewportResizeStyle.
(Again, thanks to @beho-dev for this code!)
-
We’ll be making use of these libraries:
- HelloMurder.Core
- Microsoft.Xna.Framework.Graphics
- Murder.Core.Geometry
- Murder.Core.Graphics
Add these references to src/HelloMurder/HelloMurderGame.cs.
using Bang; using HelloMurder.Core; using Microsoft.Xna.Framework.Graphics; using Murder; using Murder.Core.Geometry; using Murder.Core.Graphics; using Murder.Serialization; using System.Text.Json; -
Add the following lines to build a basic CreateRenderContext:
public ComponentsLookup ComponentsLookup { get; } = new HelloMurderComponentsLookup(); public RenderContext CreateRenderContext( GraphicsDevice graphicsDevice, Camera2D camera, RenderContextFlags settings ) { RenderContext renderContext = new(graphicsDevice, camera, settings); return renderContext; } -
Now that we’ve established a RenderContext, we can tailor it to suit our game. These settings are close to the settings HelloMurder used before release-7.0. We will:
- Create a new WindowChangeSettings instance
- Apply our desired size, and then
- Assign the RenderContext’s OnClientWindowChanged handler to the instance.
Add the lines highlighted below:
{ RenderContext renderContext = new(graphicsDevice, camera, settings); WindowChangeSettings windowChangeSettings = new( new Point(Game.GraphicsDevice.Viewport.Width, Game.GraphicsDevice.Viewport.Height) ); renderContext.OnClientWindowChanged(windowChangeSettings); return renderContext; } -
As it is, the renderer won’t scale to fit the window. To do that, we’ll specify the ViewportResizeMode.KeepRatio as a ResizeStyle parameter.
Add the ResizeStyle parameter with the following highlighted lines:
    WindowChangeSettings windowChangeSettings = new(
      new Point(Game.GraphicsDevice.Viewport.Width, Game.GraphicsDevice.Viewport.Height)
    )
    {
      ResizeStyle = new ViewportResizeStyle(ViewportResizeMode.KeepRatio)
    };

    renderContext.OnClientWindowChanged(windowChangeSettings);

    return renderContext;
Save the file when done.
Bind the Submit and Cancel buttons
Prior to release 8.0, Murder automatically added the Submit and Cancel UI buttons for us automatically. Now, we need to add them ourselves.
To start, we’ll implement the IMurderGame.Initialize() method. IMurderGame classes will call this method on startup, making it a good place for us to register input handlers.
-
We’ll need Microsoft.Xna.Framework.Input to access the button enums. Add this code to src/HelloMurder/HelloMurderGame.cs:
using Bang; using HelloMurder.Core; using Microsoft.Xna.Framework.Graphics; using Microsoft.Xna.Framework.Input; using Murder; using Murder.Core.Geometry; using Murder.Core.Graphics; using Murder.Serialization; using System.Text.Json; -
Add an empty Initialize() method.
namespace HelloMurder { public class HelloMurderGame : IMurderGame { public string Name => "HelloMurder"; public JsonSerializerOptions Options => HelloMurderSerializerOptionsExtensions.Options; public ComponentsLookup ComponentsLookup { get; } = new HelloMurderComponentsLookup(); public void Initialize() { } public RenderContext CreateRenderContext( GraphicsDevice graphicsDevice, Camera2D camera, RenderContextFlags settings ) -
We’ll be using the RegisterButton method, which maps a keyboard key to an input binding.
First, let’s bind the “Enter” key to “Submit”, and the “Escape” key to “Cancel”. Add the following lines to our Initialize() method:
public void Initialize() { Game.Input.RegisterButton(InputButtons.Submit, Keys.Enter); Game.Input.RegisterButton(InputButtons.Cancel, Keys.Escape); } -
RegisterButton has two more tricks up its sleeve:
- RegisterButton can bind more than one key to a single input binding.
- RegisterButton can support gamepad buttons instead of just keys.
So, let’s bind the “A” and “Y” controller buttons to “Submit”, and the “Back” button to “Cancel.” Add the following lines to our Initialize() method:
            Game.Input.RegisterButton(InputButtons.Submit, Keys.Enter);
            Game.Input.RegisterButton(InputButtons.Cancel, Keys.Escape);
            Game.Input.RegisterButton(InputButtons.Submit, Buttons.A, Buttons.Y);
            Game.Input.RegisterButton(InputButtons.Cancel, Buttons.Back);
Save the file when done.
Bind inputs to the UI InputAxis
We will be able to use the Enter button to activate a menu option – but the user has no way to select which menu option they want yet. To do this we will bind an “input axis” for UI controls.
- Add Game.Input.Register to the code as shown below:
    public void Initialize()
    {
        Game.Input.Register(InputAxis.Ui,
            new InputButtonAxis(Keys.W, Keys.A, Keys.S, Keys.D),
            new InputButtonAxis(Keys.Up, Keys.Left, Keys.Down, Keys.Right));

        Game.Input.RegisterButton(InputButtons.Submit, Keys.Enter);
Repair Features
In earlier releases of HelloMurder, the Features folder looks like this:
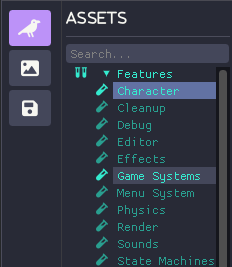
Our upgraded project is missing a couple features, though: Cleanup and Sounds.

-
The Cleanup feature refers to QuestTrackerSystem, which was removed in release 9.0. When Murder tries running, it realizes that system doesn’t exist. So it stops. So, let’s remove it.
Remove the following highlighted lines from src/HelloMurder/resources/assets/data/Features/Cleanup.json:
    {
      "Item1": "Murder.Systems.Utilities.DestroyOnBlackboardConditionSystem, Murder, Version=1.0.0.0, Culture=neutral, PublicKeyToken=null",
      "Item2": true
-   },
-   {
-     "Item1": "Murder.Systems.Utilities.QuestTrackerSystem, Murder, Version=1.0.0.0, Culture=neutral, PublicKeyToken=null",
-     "Item2": true
    }
  ],
  "features": []
Save the file when done.
-
Similarly, the Sounds feature refers to MusicSystem which was removed in release 8.0.
Remove the following highlighted lines from src/HelloMurder/resources/assets/data/Features/Sounds.json:
    {
      "Item1": "Murder.Systems.SoundsSystem, Murder, Version=1.0.0.0, Culture=neutral, PublicKeyToken=null",
      "Item2": true
-   },
-   {
-     "Item1": "Murder.Systems.MusicSystem, Murder, Version=1.0.0.0, Culture=neutral, PublicKeyToken=null",
-     "Item2": true
    }
  ],
  "features": []
Save the file when done.
At this point, if we were to restart the Architect, we would see that the Cleanup and Sounds features have returned.
Repair Gum file (Optional)
The Story, Hello.json, is out-of-date too – it won’t show the dialogue situations needed.
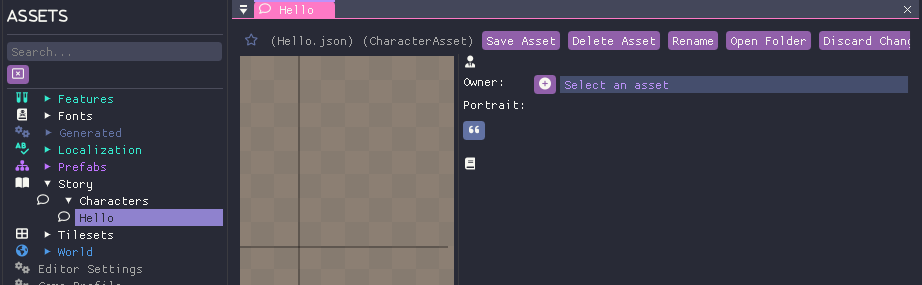
Luckily we don’t need to edit this, we can let the Architect update it for us.
-
In the Assets tab, click on Editor Settings.

Place a checkmark next to Enable Dialog Hot Reload.
Click Save Asset and then close the editor.
-
Open /resources/dialogues/hello.gum in a text editor.
Change one letter.
Save the file.
-
Reopen the Editor.
The Editor will detect that a file named hello.gum has changed, and will update hello.json accordingly.
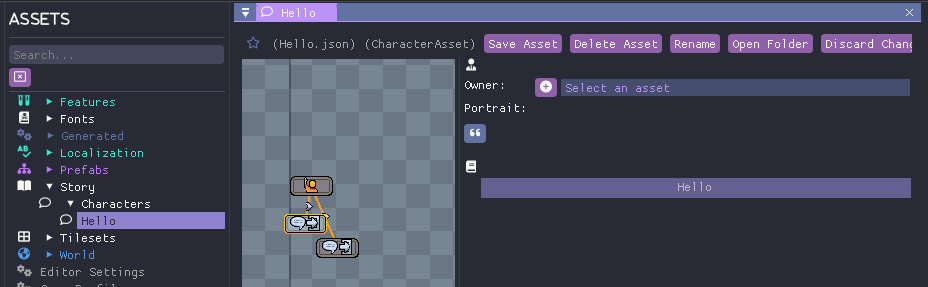
Now the situations and icons appear within the Editor as intended.
Okay! Now if you’ve made all your changes, your game should be fully up-to-date with release 10.0 and you can continue the quick start from here.
Next steps
Next, we’ll start adding code to let players move characters around.